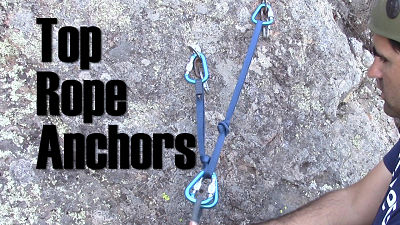
Yo ho, yo ho, a pirate’s life for me. Let’s talk a little bit about anchors. YARR!
My First Anchors
I got started outdoor climbing with a good friend of mine. Transitioning from indoor climbing to outdoor, my concept of an anchor was a rope looped around a horizontal pole a couple times.
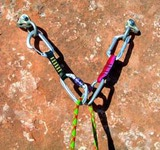 When I was introduced to outdoor climbing, I was taught a method that simply used four quickdraws. Two quickdraws were placed on each bolt, facing in the opposite direction. Then we would place the rope through all four quickdraws. (I couldn’t find a picture of an anchor with four quickdraws, but this one shows two quickdraws, but also includes locking carabiners).
Though I would probably still climb on such an anchor if it was done correctly, being able to use lockers along with a sling gives me more options on where I place my master point and feels more secure when climbing.
Why Not Thread the Rope Through the Rings?
A question that I didn’t really answer is why do we even bother to create an anchor when we’ve got some beautiful rings to clip into.
I know it may be tempting to take the lazy man’s rout and simply thread your rope through the rings to belay. Rings have been placed so that the whole climbing community can use them. If you belay on rings, the friction of the rope will wear the wear the rings more quickly and they will need to be replaced.
Unless you took the time to drill in the bolts and add the rings, these pieces of protection were a gift to you. The least you could do is honor this gift and not belay on the rings.
Note: You can rappel off of rings (rappelling will be discussed in a later video) because you are not sliding the rope through the rings as you go down. Wear on the rings come from the movement of the rope and the amount of weight put on it (so if there’s no weight on the rope, you can pull them down without worry).
Equalized Vs Self-Equalizing
 So I gave you two anchors in this video. Why? Because I wanted you to begin thinking about options of anchors instead of religiously picking one anchor form for every situation. I thought I’d share with you my thought process when choosing an anchor for a climb.
For most anchor placements I tent to choose an equalized anchor. I like having one awesome master point to clip all of my gear into. They tend to be predictable and are allow helpful if you are belaying from up top.
I tend to use the self-equalized anchor when I will be doing a couple routes off of a single anchor. In a favorite place for beginners, we will sometimes set up an anchor that can be used for four different short routes. To show off our buff muscles, we will time ourselves to climb all four climbs in one go after the other (what we call the Quadrafect). We’ve done this test of brute force with an equalized anchor, but found that a self-equalizing anchor works best for the race because the master point can shift for the particular climb we are on.
SRENE-SA
To talk more about the essential anchor principals,the video introduces you to the check off list called SRENE SA.
To Review, here are the fundamental principals of a bomber (secure, safe) climbing anchor:
- Secure: You want to make sure that what you are attaching yourself to. Imagine tying your anchor to a boulder that wasn’t weighted enough to hold your weight in a fall. Can we say Loony Tunes?
- Redundant: You want to be held by more than one piece. We also create redundancy by using two locking carabiners on the master point, tying an overhand knot, and by using limiter knots when tying a self-equalizing anchor.
- Equalized: Like in Samwise and Frodo, you want your climbing pieces to “share the load.” If you’r going to go through the effort of making your anchor redundant, you want to make sure that each of the pieces of your anchor are sharing the load. In this video, I particularly like the illustration of a non-equalized anchor. It gives a clear picture of what we’re talking about when we say equalizing an anchor.
- No Extension: You don’t want to add any extra stain to your anchor system when climbing. Take time to picture each piece coming out of the rock, will the remaining pieces have an unexpected pull? If so, you might have some extension to deal with. Typically, If your anchor is well equalized, extension usually isn’t a problem, but if you’re using a Magic-X method, you need to remember to include stopper knots to prevent extension from happening.
- Small Angles: The wider the angle on your anchor, the more weight is put on each piece during a fall. So you want your angle to be less than 60 degrees wide.
These principals are great for both Top Rope, Sport and Trad anchors. Put them to use, and they will be your friends as you continue your climbing carreers.
Many Many Anchors
These videos teach you the basic anchors that you can use when top rope climbing, but these are really the tip of the iceberg when it comes to building anchors. As you become familiar with climbing, you will learn many more ways to create anchors. If you want to learn about building anchors, there’s a whole book that was recommended to me about anchor systems. You can check it out here.
I also stumbled upon this resource that could be helpful article that I found from Chauving Guides. You can check it out here.
Connect
There’s many ways to build an anchor. When building an anchor I try to do it as quickly and efficiently as possible. Do you have any speed tips or anchor pictures that would be helpful for the Smart Rock Climbing community? Comment below to share your knowledge with the community.
Pictures are from Mountain Project and About.com.
[cjtoolbox name=’Like what youve read – Page Bottom Opt In’ ] [/cjtoolbox]
Share: